You might not know it, but wiring a thermostat is a simple step-by-step process that you can do by yourself. Most of the processes are about following safety procedures and avoiding some common mistakes. Once you know what kind of system you have, you will be done with the hardest part. In this article, you will be able to read how you can get your thermostat wired with a few tools and a few minutes. Let’s take a look:
Contents
Wiring a Thermostat
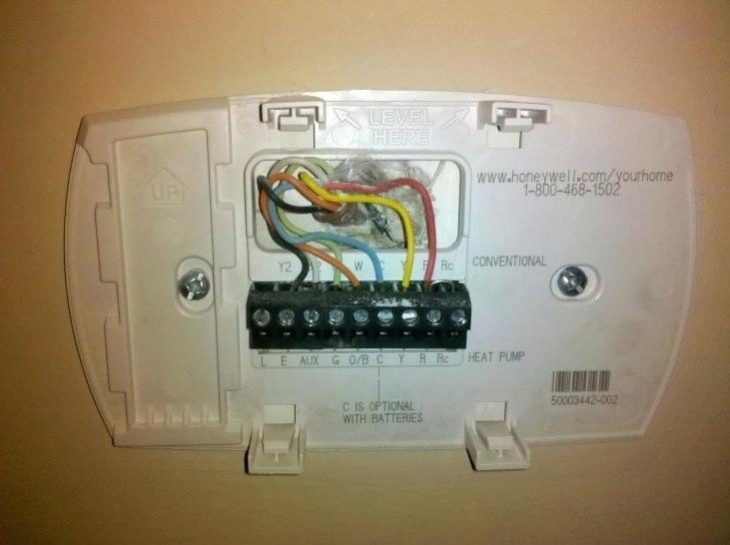
One of the most important things to remember is that the instructions for wiring a thermostat is a “cheat sheet”, hence, you should print the color guidelines, and from there, you will have everything that you need to complete the wiring. Once you understand the wiring needs, it is all about putting A to B and it is not complicated to do so. The instructions below are assuming that you will be using new wires, rather than reusing the ones that are installed.

Source: kredikurdu
For Four Wires
The wires you will need include:
1. G – Fan (Green)
2. R – 24 VAC/Rc/R/Rh (Red)
3. Y – Compressor/Air Conditioner (Yellow)
4. W – Heat (White)
Here you will be playing the matching game. Start by looking at the letters and matching them with the labels. The colors are helpful in case you get lost during the process, hence, the order of priority when installing is Letter>Color.
For Five Wires
1. G – Fan (Green)
2. R – 24 VAC/Rc/R/Rh (Red)
3. C – 24 VAC Common (Blue, brown, or purple)
4. Y – Compressor/Air Conditioner (Yellow)
5. W – Heat (White)
The main difference between the four and five is the common wire, which is only available in the five-wire setup. With a common wire, you get a piece that provides power from the transformer. Hence, it is a wire that you do not want to play around with or place it in the wrong spot. Keep in mind that you should turn off the power entirely before connecting the wire and this applies for both wire setups. A common mistake that people make is mixing up the wires, and if you want to make sure that that does not happen, use a magnifying glass if the letters are too small. The connecting process is the same as the setup for four wires, hence, make sure that you double-check everything.
Frequently Asked Questions

Source: iStock
Does Thermostat Wire Type Matters?
You will run into two types of wires which will depend on the installation you plan on doing. 18 gauge wire or 20 gauge wire will be your two main options. The easiest way to opt for one is based on the length, opt for 18 gauge if you need up to 200 and if you need a shorter length, opt for 20 gauge. Of course, this is assuming that something larger is installed like an HighPerformanceHVAC thermostat, which has more functions than a regular one.
What Gloves Should I Use?
Gloves are entirely options, but, if you want more security, choose rubber gloves. Any pair of usual, cheap rubber gloves will fo just fine. Hence, if something goes wrong during the installation process, you will be protected thank to the rubber.
Can Anyone Install a Thermostat?
The answer is quite simple – yes. If you follow the instructions, then you will be able to handle thermostat wiring. It is all about understanding where each wire goes. You will not need experience, all you will have to do is follow the guidelines and stay safe.
Conclusion
As you can see, wiring a thermostat can be done by anyone and by following the tips from this article, you will be able to make the whole process even easier.
